*If you experience technical difficulties please contact websupport@newarkarts.org. For any other questions please contact festival@newarkarts.org
INSTRUCTIONS:
What should my Event Title be?
This is your event’s name. Choose a name that best represents your event. There’s no need to include day, time or location as this information will be available in other parts of the listing.
What to include in my Event Description?
Include all details you want your guests to know about your event. This might include: a description of your event program, schedule of performances, featured artists, featured performers, the menu for the evening, instructions on where to park, etc. You can also include hyperlinks!
How to set up Event Time & Date for Repeating Events?
- If your event only happens once during the festival, set up the date, start time, and end time.
- If your event happens every day of the festival, at the same time every day, choose a Daily Repeat and complete the requested fields.
- If your event happens every day of the festival, but at different times each day, choose the Once Repeat for each date it repeats and complete the requested fields. You can click on ADD MORE EVENTS button to add as many Once Repeats as you need.
- If you want to use the built in RSVPs and Tickets options, submit an individual form for each of your event instances to avoid errors.
What should my Event Image be?
Please submit 1 icon image that best represent your event (not posters/flyers or marketing material) with a 1:1 aspect ratio (1080px by 1080px). Please keep file size under 1MB and in jpg, png or gif format. If you need to compress your image file size, we recommend https://tinyjpg.com/ If you need a free photo editor, we recommend https://www.photopea.com/
How do I Change My Event Image After I submitted My Event?
To change the event image once you’ve submitted your event, scroll down to “My Events”, find your event, and click edit. Then scroll until you see “remove my image”. Remove your image, and upload you new image. Easy!
What are Event Categories?
Event Categories, represent each day and theme of the festival for NAF2024. Please pick the date in which your event will take place.
If your event repeats, please pick all the Categories/Days in which the event is ocurring.
What are Event Tags?
Event Tags, represent various descriptors for events that will help festival guests know what the event will include. They could be art mediums, target audiences, etc. Choose the ones that best fit your event.
How to submit a Virtual Event?
You have the option to attach a video to the event by adding a link to the “Add Video” field.
Virtual events can be links available at any time like a Youtube or Vimeo playlist/video or a live event at a specific date and time during the Festival like a Facebook watch party, Youtube Live, Zoom or Twitch (you can embed your live feed right on the NAF website).
What is Event Status?
Choose the default Scheduled when submittingyour event. You can come back and edit it if things change and your event gets Postponed or Canceled.
How do I add Venue and Organizer Details?
Start typing and click on Create to add your Venue and Organizer details. Complete the fields requested.
What should I put in Event Website?
If you have an external link you want to point your guests to, this is where you add it.
Additional Fields
Please choose Yes or No to let festival guests know if Accessible accomodations into your event space are available.
How to set up Tickets?
To make a purchasable ticket, we click + New Ticket. *If you want to collect attendee RSVPs without selling tickets, you can click + New RSVP instead.
These are the Ticket fields to complete:
- Name lets you set a unique name for the ticket – which might be something like Standard, Adult, VIP, etc.
- Description is optional, but it’s a good space to add any information customers might be interested in, such as doors open at 7pm or not recommended for children. Click checkmark to show description in the purchase ticket view.
- Start sale dictates when the tickets are available for purchase. Completing this field is optional – by default, sales will start when you publish the event.
- End sale does the reverse – you can set this to a date after which the tickets should no longer be available for purchase. Completing this is optional – by default it stops sales when the event starts.
- Price controls the price of each ticket. If the tickets are free – you can leave this field blank or set it to 0. *We recommend using RSVPs for Free tickets to have your guests avoid the Check out process.
- Sale Price: This option is available if you want to offer some tickets at a discounted price, such as Early Bird Tickets for a specific time span. You can set dates to start and end the Sale.
- Capacity is the number of tickets that are available: if you leave this blank it is assumed that there is no limit and customers can buy as many as they would like. If you have a limited number of spots for your event, you’ll want to make sure to set this accordingly.
- Share Capacity with other tickets: These Tickets share a common pool of capacity with others. *Choose this if your venue has a set capacity and you are selling different ticket tiers.
- Set Capacity for this Ticket only: Capacity is specific to this ticket. *Choose this if you are selling a limited number of this kind of ticket, like limited VIP tickets.
- Unlimited Capacity: Choose this if there is not set capacity for this ticket.
- Attendee Collection: We recommend choosing Allow Individual Attendee Collection in order to collect guests names and emails.
How to set up RSVPs?
If you want to collect attendee RSVPs without selling tickets, you can click + New RSVP instead to have a list of people who will be attending.
These are the RSVP fields to complete:
- Name: lets you set a unique name for the RSVP – which might be something like Standard, Adult, VIP, etc.
- Description: is optional, but it’s a good space to add any information customers might be interested in, such as doors open at 7pm or not recommended for children, etc. Click checkmark to show description to guests.
- Start sale: dictates when the RSVPs are made available. Completing this is optional – by default, sales will start when you publish the event.
- End sale: does the reverse – you can set this to a date after which the RSVPs should no longer be available. Completing this is optional – by default sales stop when the event starts.
- Capacity: is the number of RSVPs available: if you leave this blank it is assumed that there is no limit. If you have a limited number of spots for your event, you’ll want to make sure to set this accordingly.
- Can’t Go: We don’t recommend clicking on this option. Leave unchecked.
Tickets Extra Settings
In the SETTINGS button, to the right on the Tickets section, you can set up additional settings.
- Shared Capacity: Here you can set the total capacity of shared capacity available tickets. Ex: 100 capacity (30 VIP + 70 Standard Adult Tickets)
- Independent Capacity: This will display the total number of independent capacity tickets you have set.
- RSVPs: This will display the amout of RSVPs you have set.
- Total Capacity: This will display all the above numbers combined.
- Ticket Header Image: This is an image that you would like included in your purchased Ticket and confirmation emails. Click Select an image button, go to the Upload Files tab and drop your image. For best results, use a .jpg, or .png, at least 1160px wide.
Where do I find my Ticket Sales and RSVPs Report?
When you create an event with Tickets/RSVPs, your list of submitted events will have a new section under the TITLE column. Look for Reports and follow the link to be redirected to your event’s guests data.
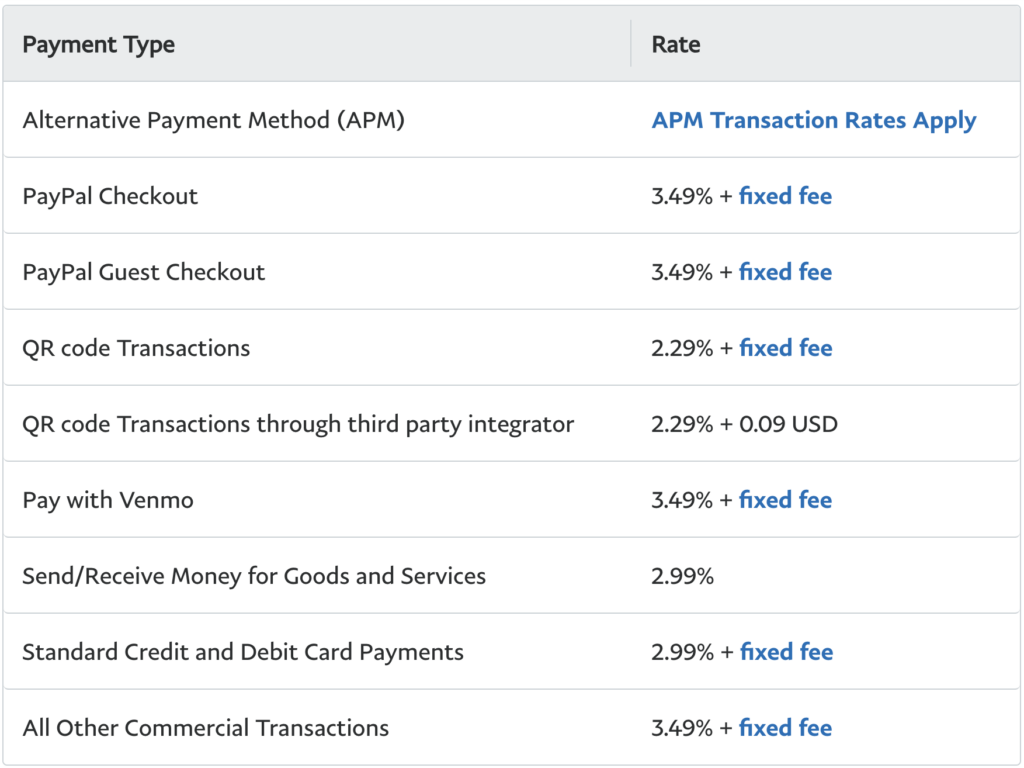
Are there any payment processing fees?
ADD NEW NAF EVENT
*After submitting your event, refresh/reload the page to see it in the My Events section below and be able to edit them as you see fit until the festival dates.
Please log in to create events.
Lost your password?EDIT YOUR SUBMITTED EVENTS HERE
*You can only see, edit or delete your own Submitted Events.
*Submitted Events can be edited as necessary until the day of the event.
*All events listed here will be immediately available for the public, please make sure all information entered is correct.
*Review your event visiting newarkartsfestival.com/events and click on the event name to visit your event’s single view.
Please log in to view your events.
Lost your password?SPONSORS
In partnership with

Powered by

SPONSORS
In partnership with

Powered by


